
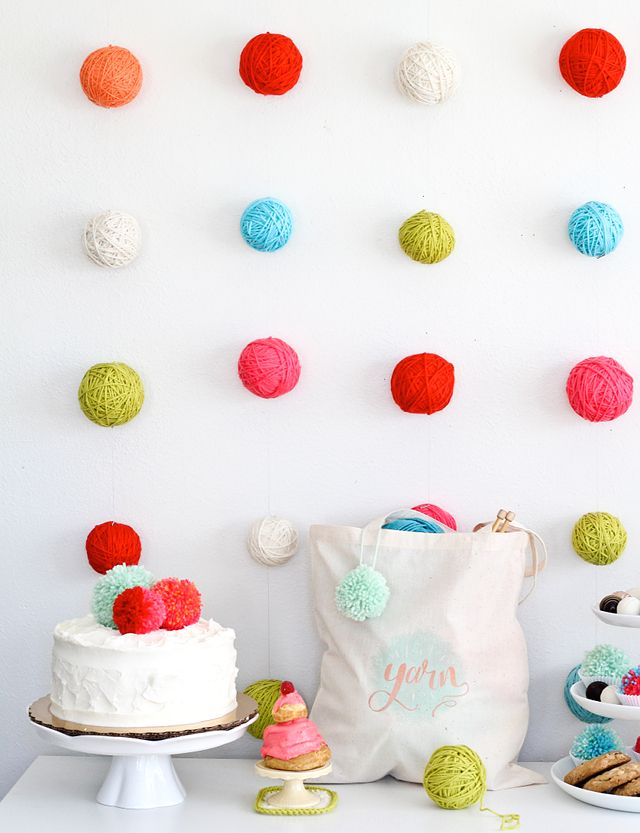
Yarn Ball Wall Garland Tutorial

The yarn ball wall display is one of my favorite pieces from the Emma Magazine Yarn Party! It was relatively easy to create and looked beautiful hanging on the wall. The wire connecting each yarn ball was so light that it looked like the yarn was floating! It was the perfect backdrop for the dessert table and a fun place to take photos of the guests.

Materials:
- T pins
- Styrofoam balls, size 3"
- Acrylic yarn in a variety of colors
- I'm sure fishing line would work great for this project but I was worried it would curl too much. Instead I used a thin, silver bead stringing wire by Beadalon. I found it in the jewelry section at Hobby Lobby! It worked perfectly for this project.
- A wooden dowel


Step 1: Gather your materials. Begin wrapping the yarn around the yarn ball. If you need to secure the first yarn strand with a pin, do so, but I was able to wrap it around enough to keep it from slipping.
Step 2: Continue wrapping until the ball is covered with yarn. Wrap as many as you need for the garland. I made five separate strands with five balls on each string.
Step 3: Secure the loose yarn with a pin. Place another pin directly across from this pin on the yarn ball. Now each yarn ball has a pin on the top and bottom.
Step 4: Take a length of wire and tie it to the top of the pin on one yarn ball and the top of the pin on the next yarn ball. Continue attaching the yarn balls this way until you are finished.
Step 5: Use a pencil to evenly mark dots across the top of the dowel. I spaced my yarn ball strands about seven inches apart. Use a drill to make the holes in the dowel.
Step 6: Secure the top wire by knotting in through the hole in the dowel. Repeat until all of the strands are secure.
Now you are ready to hang your yarn ball display!
Now that the party is over, I wish I had a cute knitting shop window to display my yarn ball garland! Maybe one day...haha. ;)
I hope you give this project a try! Are you thinking about hosting a yarn party this summer?